New35 min
Orabake laden…
BEFORE YOU START
Prepare Muffin tin
METHOD
STEP 1
Important: Make sure all ingredients are at room temperature before you start!
STEP 2
Step 1 - Bake cupcakes:
STEP 3
Preheat the oven to 175gr and prepare the 2 baking tins with a paper baking tin in each hole.
STEP 4
Cut the butter into small cubes and put it in a large bowl. Mix the butter with a hand mixer while you add the sugar little by little. Keep mixing until you have a creamy butter. Then add the eggs 1 to 1 and keep mixing. You're getting a light batter because of this.
STEP 5
Then you add little by little the self-raising baking flour as you keep mixing. And finally, the milk. After this you mix for another minute and then the batter is ready. Quietly spat the discodip until it is well mixed.
STEP 6
Then fill with a spoon the paper trays for 2/3 full. Put the 2 baking tins in the oven for 15-20 minutes. The cupcakes are cooked when you put a satep trigger in it and it comes out dry. Then remove them from the oven and put them on a grill to cool off. If your cupcakes have become a little too big, put a cutting board on it for a moment. They'll be flat in a minute.
STEP 7
Let the cupcakes cool well.
STEP 8
Step 2 - Create butter cream:
STEP 9
While the cupcakes are cooling, you can make the butter cream. After preparation, do not put it in the refrigerator, as it becomes hard and is not workable in the syringe bag. So let's say you make the cupcakes at night and pick them up in the morning. Then leave the butter cream covered on the countertop.
STEP 10
Mix the cream, vanilla extract and salt in a small bowl. Take a big bowl and put the butter (in cubes) in here. Mix this soft and airy with the hand mixer. Then add the icing sugar little by little and keep mixing (and yes, then your whole sink becomes white, at least with me). When all the sugar is added add the cream mixture and mix for another minute or 3-4, until you have a nice creamy and fluffy cream.
STEP 11
Put the cream in a spray bag. I always put the spray bag in a measuring cup and then I can fill it well. Then I hold the bottom with 1 hand and turn the top closed with the other hand. You can apply pressure to the top and squeeze gently with your lower hand so that the cream comes out of the nozzle. Hold the nozzle straight above the cupcake and spray from the outside to the inside a nice tooth on it. Note: do not make the cupcakes until the cupcakes are completely cooled!
STEP 12
Step 3 - Decorating:
STEP 13
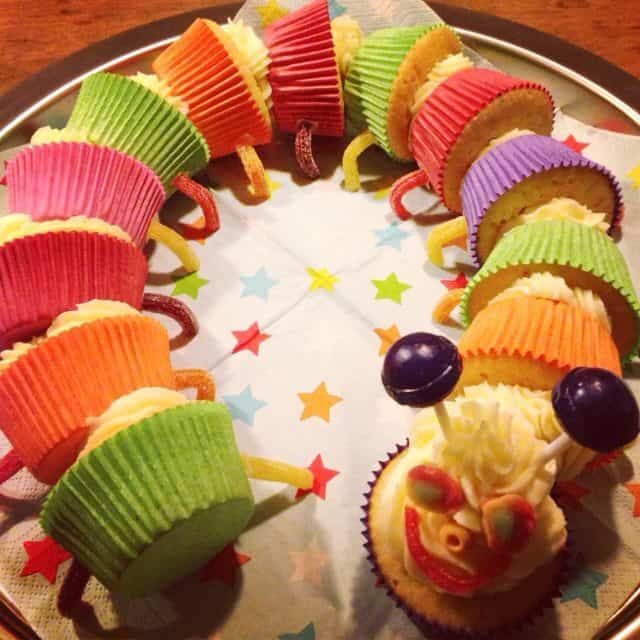
Take a large bowl and place a piece of 16 cupcakes on their side in the shape of a caterpillar. The head of the caterpillar is made of an upright cupcake. Make an extra large toffee with the butter cream.
STEP 14
The legs are made of pieces of bendable acid cables. Paste these with a small piece of double-sided tape to the paper shapes (left and right). Be careful with the food that the kids don't put bits of tape in their mouths!
STEP 15
The face is made as follows:
STEP 16
Make a mouth of a thin cut piece of acid cable. This is easily bendable so you can make it a laughing mouth
STEP 17
The nose is made of a little round candy
STEP 18
I made the eyes by cutting circles out of the pizza foam gums. You can also use other round candies
STEP 19
The 2 lollipops are placed at the top of the 'head' as 2 antennae
STEP 20
And tada! Your cupcake caterpillar is ready Enjoy your treat!
STEP 21
Thanks to Cupcake Recipes for the basic recipe for cupcakes and butter cream.
BAKING DETAILS
Recipe for homemade children's treat: the cupcake caterpillar
STORING & SERVING
ALLERGENS
Gluten · Milk · Egg
Always check product labels yourself if you have allergies.
Source or inspiration ↗MISSING AN INGREDIENT?
Try: Margarine · Neutral oil — when the recipe allows oil.
Try: Soy milk — unsweetened · Oat milk — unsweetened.
Try: Plain flour — with 2 tsp baking powder per 250 g.
Substitutes can change flavour, texture or rise. If you have allergies, always check the label yourself.
COMMUNITY
QUICK REACTION
BAKED BY THE COMMUNITY
Made this recipe? Post your photo. The approved photo with the most hearts automatically becomes the main recipe photo.
Loading photos…
Loading reviews…