New50 min
Orabake laden…
BEFORE YOU START
Preheat to 175°C · 347°F
Prepare Baking dish
METHOD
STEP 1
1 day in advance, morning/afternoon
STEP 2
First you make the dulce de leche with the jar of condensed milk. You do this very easily yourself, you can find the recipe here. Let the dulce cover the leche until you continue to make the filling.
STEP 3
1 day in advance, afternoon/evening
STEP 4
Now it's time to make the soil and stuffing. Preheat the oven 175 degrees. Take rectangular baking tin and cover it with aluminium foil. Do this crosswise, so first a piece of aluminium foil from left to right and then from top to bottom. Make sure everything is covered up. Important is that you select a baking tin that you can put back in a bigger can, because the cheesecake will have to stand in a bowl of water when it goes into the oven.
STEP 5
Crumble the cookies in the stand mixer and put the sugar and 45Gr melted butter. Grind this to a solid mixture and then pour into the baking tin. Divide the mixture evenly with your fingers over the bottom and press well. Set the baking tin 10 minutes in the oven and then let cool.
STEP 6
Put the agar agar in a large bowl and pour the milk here. Leave this 2 Stand for minutes. Then add the cream cheese, eggs and salt and mix about 2 minutes with the hand mixer to a creamy whole. Then slip through all the dulce de leche until it is well mixed. Pour the filling over the cookie bottom and spread evenly by tilting the baking tin a little. Egalize the top if necessary.
STEP 7
Place the baking tin in a larger oven dish and pour boiling hot water between both walls to approximately 2Inches below the edge. Place this whole very carefully in the oven, turn the temperature back to 160 degrees and fry the cheesecake about 45 minutes. The cheesecake is good when the middle is just cooked, but still a little 'drilt'. Remove the cheesecake from the oven and from the bowl with water and let cool. Then cover with aluminium foil and place in the refrigerator all night.
STEP 8
Same day, in the morning
STEP 9
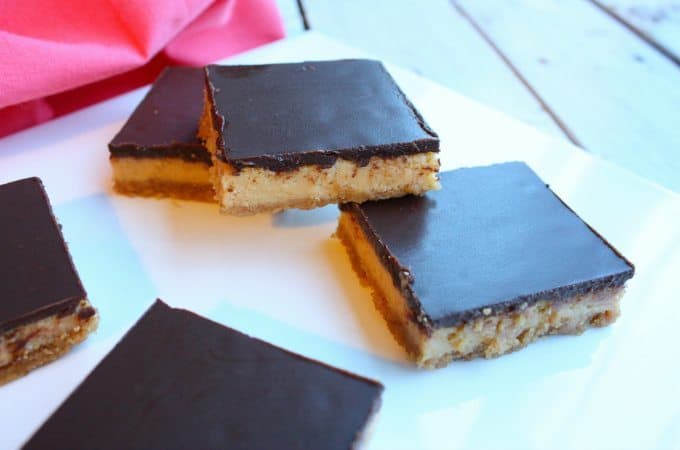
Now comes the oh so nice part of the recipe! Break the chocolate into coarse pieces and melt it together with the butter and golden syrup au bain marie, or in a glass container above a bowl of water. Once the chocolate is completely liquid, pour it over the cheesecake. Tilt the baking tin very quietly with your hands so that the chocolate topping nicely spread all over the cheesecake. And then you let it stand, so really don't do anything about it!
STEP 10
Put the can uncovered for half an hour in the refrigerator so that the chocolate can harden well. You'll get a fantastic shiny chocolate layer.
STEP 11
The last step is to cut the squares. Use a large, sharp knife that warms you first. The trick to get nice, clean squares is to wipe your knife with kitchen roll after every cut.
STEP 12
Tip: Do you want to add another dimension? Then sprinkle the sel flakes on the chocolate if it is still warm. You get a salted caramel effect.
STEP 13
For me, these are the ultimate treats! Every bite I took, I was such a happy person. What is the ultimate treat for you?
STEP 14
Source: Smitten Kitchen
STEP 15
Follow Francesca Kookt! also on Facebook, Twitter, Google+, Bloglovin' or Instagram.
BAKING DETAILS
Ultimate indulgence with this homemade dulce de leche cheesecake squares. In this recipe you read how to make them step by step.
STORING & SERVING
ALLERGENS
Gluten · Milk
Always check product labels yourself if you have allergies.
Source or inspiration ↗MISSING AN INGREDIENT?
Try: Ground flaxseed — 1 tbsp with 3 tbsp water per egg · Apple sauce — unsweetened, only in suitable cake batter.
Try: Soy milk — unsweetened · Oat milk — unsweetened.
Try: Mascarpone.
Substitutes can change flavour, texture or rise. If you have allergies, always check the label yourself.
COMMUNITY
QUICK REACTION
BAKED BY THE COMMUNITY
Made this recipe? Post your photo. The approved photo with the most hearts automatically becomes the main recipe photo.
Loading photos…
Loading reviews…